• Menu
  • Product
  • Email
  • PDF
  • Order now
  • DRV2625 ERM, LRA Haptic Driver Evaluation Kit

    • SLOU432B December   2015  – December 2021 DRV2625


  • CONTENTS
  • SEARCH
  • DRV2625 ERM, LRA Haptic Driver Evaluation Kit
  1. 1 Getting Started
    1. 1.1 Evaluation Module Operating Parameters
    2. 1.2 Quick Start Board Setup
  2. 2 DRV2625 Demonstration Program
    1. 2.1 Modes and Effects Table
    2. 2.2 Description of the Demo Modes
      1. 2.2.1 Mode Off – Haptics Effect Sequences
      2. 2.2.2 Mode 4 – ERM Clicks
      3. 2.2.3 Automatic Braking in Open Loop
      4. 2.2.4 Auto-Resonance Tracking
    3. 2.3 ROM Library Mode
    4. 2.4 Waveform Library Effects List
  3. 3 Additional Hardware Modes
    1. 3.1 Accessing GUI Mode
    2. 3.2 Accessing Bluetooth Mode
    3. 3.3 Haptics Control Console GUI
      1. 3.3.1 DRV2625 Console
  4. 4 Hardware Configuration
    1. 4.1 Input and Output Overview
    2. 4.2 Power Supply Selection
    3. 4.3 Using an External Actuator
    4. 4.4 PWM Input
    5. 4.5 External Trigger Control
      1. 4.5.1 MSP430 Trigger Control
      2. 4.5.2 External Source Trigger Control
    6. 4.6 External I2C Input
      1. 4.6.1 External I2C Control Initialization
    7. 4.7 Analog Input
  5. 5 Measurement and Analysis
    1. 5.1 Using Low-Pass Filter to Record Waveforms
  6. 6 Modifying or Reprogramming the Firmware
    1. 6.1 MSP430 Pin-Out
  7. 7 Schematic
  8. 8 Layout
  9. 9 Bill of Materials
  10. 10Revision History
  11. 11Trademarks
  12. IMPORTANT NOTICE
search No matches found.
  • Full reading width
    • Full reading width
    • Comfortable reading width
    • Expanded reading width
  • Card for each section
  • Card with all content


USER'S GUIDE

DRV2625 ERM, LRA Haptic Driver Evaluation Kit

1 Getting Started

The DRV2625 can be used as a demonstration or evaluation tool. When the DRV2625EVM-CT evaluation module is powered on for the first time, a demo application automatically starts. To power the board, connect the DRV2625EVM-CT to an available USB port on your computer using the included micro-USB cable. The demo begins with a board power-up sequence and then enters the demo effects mode. The four larger buttons on the wheel (1–4) can be used to sample haptic effects using both the ERM and LRA motor in the top right corner.
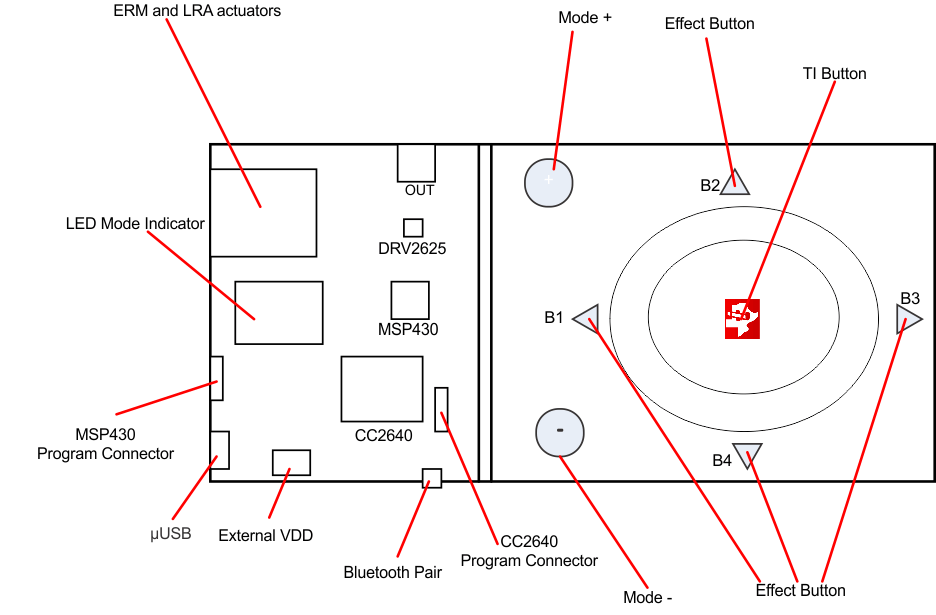
GUID-6B210309-F678-42E5-99F1-53047A7AFC88-low.gifFigure 1-1 Board Diagram

1.1 Evaluation Module Operating Parameters

The following table lists the operating conditions for the DRV2625 on the evaluation module.

Table 1-1 Recommended Operating Conditions
ParameterSpecification
Supply voltage range2.7 V to 5.5 V
Power-supply current rating400 mA

1.2 Quick Start Board Setup

The DRV2625EVM-CT firmware contains haptic waveforms which showcase the features and benefits of the DRV2625. Follow the instructions below to begin the demo:

  1. Out of the box, the jumpers are set to begin demo mode using USB power. The default jumper settings are found in the table below.
    Table 1-2 Jumper Descriptions
    JumperDefault PositionDescription
    J3Short pin 2-3Powers using USB
    J2Short pin 2-3USB power to DVDD
    J5ShortedLevel translator
    J17OpenTrigger/NRST for DRV2625
    J7ShortedBypass the I-Sense
    J8ShortedMotor+ terminal
    J9ShortedMotor- terminal
    J4OpenSDA/SCL connections to debug/Monitor advanced operations
  2. Connect the included micro-USB cable to the USB connector on the DRV2625EVM-CT board.
  3. Connect the other end of the USB cable to an available USB port on a computer, USB charger, or USB battery pack.
  4. If the board is powered correctly, the LEDs will blink and the LRA and the ERM actuator will spin and stop at the start up.

2 DRV2625 Demonstration Program

The sections below provide a detailed description of the demo modes and effects.


Texas Instruments

© Copyright 1995-2025 Texas Instruments Incorporated. All rights reserved.
Submit documentation feedback | IMPORTANT NOTICE | Trademarks | Privacy policy | Cookie policy | Terms of use | Terms of sale